 |
 |
|
On Shaper |
On Shaper |
Click on any photo to see a larger version.
The process of reed-making can begin at a variety of starting points, depending on the experience level of the reed-maker. Professional oboists often start with tube cane. Beginning reed-makers start from gouged, shaped, and folded cane. I start in-between, with gouged cane. The first step I take is called shaping, followed by tying on and scraping.
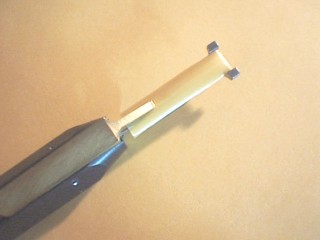
Gouged cane has straight sides, but for a reed we want to remove some material so that the bottom is narrower than the top. A shaper is a piece of metal that has been machined precisely into the shape we want. After soaking in warm water for about half an hour, the cane is folded onto the shaper and clamped securely in place, as shown here.
|
|
|
|
On Shaper |
On Shaper |
A wedge knife is drawn downward through the cane, following the contour of the shaper. After several strokes on each side, the remaining cane will lie flush with the sides of the shaper. Upon removal from the shaper assembly, we have gouged, shaped and folded cane.
 |
Gouged, shaped, |
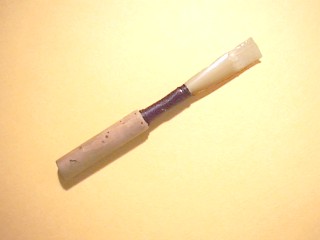
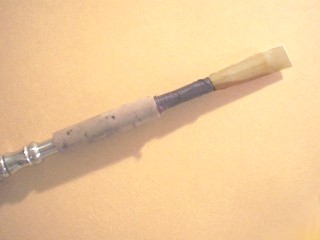
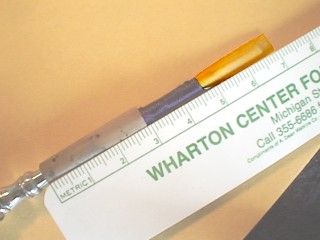
The cane is now tied onto the staple. In this step, the cane is folded completely over upon itself; the two ends will soon form two separate reeds. I position my cane so that the completed assembly is 74 mm in length; this leaves 17 mm of cane exposed above the end of a 47-mm staple. Nylon string is wound and tied around the cane/tube assembly to hold the cane in place. The sides of the cane must be aligned precisely enough, and the string wound tightly enough, that the finished assembly is airtight.
 |
Cane tied on |
The most important part of reed-making is scraping. Typically, I place the reed on the mandrel and hold this assembly in my left hand. The knife is held in my right hand and pivoted against my left thumb so that the blade scrapes upward along the cane. (All oboe reed scrapes are made upward, toward the tip, as shown below.) I begin by making a dozen or so scrapes on each of the four corners (two on each side) of the tip.
 |
First strokes |
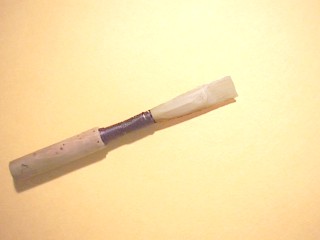
Work on the tip continues, always keeping the cane moist by dipping it occasionally in a small cup of water. After a few minutes of scraping, the plaque is inserted in between the folds of the cane. By raising the plaque upward and slicing through the end of the tip, the cane is separated into two independent blades. After several more minutes, the tip begins to take shape, as shown here.
 |
The tip |
During most of the remaining scraping process, the plaque is inserted between the blades of the reed to provide support for the cane, as shown below. The end of the tip will eventually be cut off, several times, until the reed has been reduced to a length of about 70 mm.
Meanwhile, scrapes are now made a few millimeters behind the tip, forming the heart section. The shape and thickness of the heart is probably the most important variable in differentiating one player's reeds from another, and in determining whether one has a "good" reed or a "bad" reed.
 |
The heart |
After the heart begins to take shape, scrapes are made farther back, half-way to the right and half-way to the left of center. The goal is now to remove cane from the two regions called windows, yet leaving the cane along the side rails and the middle spine relatively untouched (see diagram above). Eventually all the bark is removed from the spine, but some bark remains along the rails about half-way up the reed.
 |
The back |
Once the basic shape described above has been formed (perhaps after 10 or 15 minutes of work for me, less for a professional), a nearly unending process of additional scraping, clipping, and testing begins.
Testing the crow
Besides inserting the reed into the oboe and playing it, the most important diagnostic for how the reed will perform is to crow it. The crow is the sound made when air is forced through the reed without touching the cane. To make it crow, the reed is placed far enough in the mouth that one's lips can be closed around the windings (instead of around the cane, as is down when playing), and then enough air is forced through the reed to cause it to make a sound.
As the reed progresses through the various stages of scraping, drying out, soaking, aging, etc., the crow will change dramatically. The goal is a not-so-often achieved sound comprised of three C's (middle C and the C's one and two octaves above that). The relative volume of the three octaves is indicative of the response (ease of speaking, ease of articulation, etc.) that the reed will have when it's played. The pitch of the crow is indicative of the intonation (pitch calibration) that can be obtained when playing. Intonation is important not just for the obvious reason, but also because the oboe is traditionally (though mysteriously) used to tune the rest of the orchestra.
You can hear a typical crow here
.
Playing
I test the reed by playing it (just a few notes, usually) in the oboe almost as often as I test the crow. Some oboists can make almost finished reeds only by testing the crow, but I'm not likely to try that any time soon.
More Scraping, Clipping, and Testing
After each crow or playing test, additional scrapes are made. Various symptoms suggest thinning the tip, or lengthening the back, or reducing the heart, etc. Other tests are made as well. For example, the opening of the reed is examined (not usually by measurement, but just by inspection) and sometimes adjusted by squeezing the blades together or slipping them, side-to-side, relative to each other. Also, the relative thickness of the tip is measured, usually by pushing each blade inward (one at a time) with the tip of a plaque. The blades should be matched in thickness at all points.
During the final stages, the appearance of the reed does not change much, since smaller and smaller amounts of cane are removed with each step. (Once cane is removed, it can't be put back!) By the time the reed plays fairly well, the blades will be as thin as 100 µm (about the thickness of a sheet of paper) at the tip.
 |
Closer |
Done?
I hardly ever declare a reed "done." More often, it's "nearly done" for most of its life, during which its quality eventually decreases, and then one day it's declared "dead." Sometimes older reeds can be rejuvenated; frequently a reed that played well for one kind of application (e.g. playing with a good tone quality in a Brahms symphony) may have a second life for a different use (playing easily for pit orchestra rehearsals).
 |
Finished |